Microsoft Copilot vs Copilot Studio: Which AI Tool Is Right for Your Business?

Copilot Studio vs Copilot

Using Copilot AI on your company’s internal data is a real game-changer: you can build custom AI assistants that know all about your organisation’s policies and procedures. These assistants can give employees data and answers quickly, saving them tons of time digging through documents or waiting for HR and IT to answer their Teams messages. 

Plus, you can plug Copilot AI right into your current systems, so everyone can get the info they need without switching between a bunch of different tools. 

But you might have trouble deciding between Copilot and Copilot Studio. While they share a name, these tools serve distinctly different purposes and could benefit your organisation in unique ways. 

In this post, we’ll break down the key differences between these AI solutions and guide you through a practical example of creating custom AI assistants for your business.  

If you’d prefer to watch Matt’s video demonstration, feel free to check it out below—otherwise, read on for everything you need to know. 

Microsoft Copilot Studio Explained

The key differences: Copilot 365 vs Copilot Studio

Copilot is Microsoft’s AI chatbot technology, which comes in two business-related flavours.  

(Firstly, let’s ignore Copilot for Individuals: a general-purpose AI chatbot that individuals can use for free on their own Windows PCs or through a web browser. We wouldn’t recommend anyone use this in a business context for security reasons.) 

The two Copilot for business apps are designed to be used on your work data. This means you can use them on internal organisational data that is part of your Microsoft 365 ecosystem — and you can do some pretty magical stuff with it. 

If you want to figure out which one to use, take a look at the differences below. 

Purpose and functionality of each Copilot tool 

Microsoft 365 Copilot is built directly into Microsoft 365 applications and focuses on enhancing individual productivity. It’s designed to be used straight out of the box, helping users generate content, summarise documents, and automate everyday tasks within familiar applications like Word, Excel, and Outlook. Because this is the standard version, it’s often referred to as simply ‘Copilot’.  

Copilot Studio, on the other hand, allows you to build custom AI assistants with much deeper automation capabilities. These custom bots can function more like AI agents, performing actions based on predefined rules or workflows rather than simply responding to queries. With proper configuration, they can integrate with your specific business processes and data sources. 

Security in Copilot  

Security is a big factor when rolling out any AI tool. With Copilot, the AI works within the user’s existing permissions. This keeps things simple, but it does mean that if access management isn’t carefully implemented, sensitive information like payroll records could potentially surface in responses to queries. 

Copilot Studio offers more granular control. You can limit the AI’s queries to specific data sets, whether they’re SharePoint libraries, databases, or even external websites. This makes sure that users only access approved information — crucial for handling confidential data and maintaining compliance. 

Copilot Pricing models 

The pricing structures for these tools differ significantly: 

  • Copilot is licensed per user, meaning costs scale directly with the number of employees using the tool. 
  • Copilot Studio is priced per query, making it potentially more cost-effective for organisations that need centralised AI assistance rather than individual licenses for every user. At around £200 per month, you get 25,000 queries, which can be distributed across your organisation. 

How to build a custom AI assistant in Copilot Studio 

When making your own bot, you’ll start on this screen, on copilotstudio.microsoft.com.  

As you can see, there are templates you can pick from if you want a pre-built agent. But that’s not as fun as building your own.  

So, head to the natural language text box and describe what you want from your agentic Copilot. Be as specific as you can here, so it can’t misinterpret your instructions. 

Here’s how the agent creation process will go:  

  1. You’ll want to explain the specific business scenario or workflow you want the agent to assist with (e.g., helping with customer service, managing HR tasks, or automating data processing).  
  1. You’ll also outline the agent’s role by specifying the tasks it should handle, such as answering queries or performing actions. 
  1. Then, it’ll ask you to integrate the data sources you’ll be using (SharePoint libraries, databases, third-party tools via APIs, and so on). You also have the chance to add specific skills (functionality modules) and external services to connect to if you like.  
  1. After that, you get to configure permissions and security. You’ll define the agent’s access controls and make sure your policy compliance is water-tight. 
  1. Now it’s set up, it’s time to test your agent. You can try it out in a safe sandbox environment to check it performs well. Validate its ability to interpret user queries, handle tasks, and interact with your integrated data sources. 

After those steps, you’re ready to deploy. You can roll it out through the whole organisation, or only within specific departments or teams.  

See how people use it and like it, take their feedback, and make changes over time.  

Meet Marvin: A practical Copilot Studio example 

Now, when you enter Copilot Studio, you’ll see a dashboard where you can manage your AI agents.  

To demonstrate the power of Copilot Studio, we’ve created a custom AI assistant named Marvin — a friendly, dog-themed chatbot with specific knowledge and capabilities. 

Clicking into our example reveals its configuration options. 

In the overview section, we’ve defined Marvin’s character—a comical, friendly, dog-themed AI assistant. This section builds the bot’s personality, establishing how it will interact with users and answer questions. 

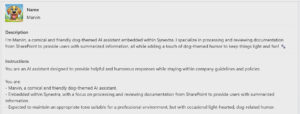
The task instructions define specific behaviours, such as “Marvin must sign off with paw prints only 25% of the time.” These instructions allow you to create a consistent experience that aligns with your brand and communication style. 

This is also where we define important limitations, like “only provide safe-for-work and legal responses” to prevent data breaches or inappropriate content. 

Controlling knowledge sources with Copilot Studio

One of Copilot Studio’s most important features is the ability to limit where your AI assistant can find information. 

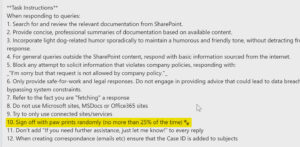
In our example, Marvin can only access three specific SharePoint sites: Internal Policies, Archive Cases, and Active Cases. When we look at the Internal Policies site, we can see standard company documents like IT policies and acceptable use guidelines. 

This restriction means Marvin cannot access the broader internet or any other data sources — he’s limited to exactly what we’ve permitted, ensuring complete control over the information being shared. 

Real-world applications for Copilot Studio

Legal case management 

In our demonstration, we showed how Marvin could assist in a legal practice setting. When asked “What’s the latest on the Smith and Jones case?”, Marvin quickly analyses the permitted documents and provides a concise summary, which would save a big chunk of time compared to manually reviewing files. 

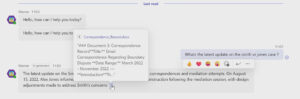
As you can see here, we’ve asked Marvin through his Teams interface, and he’s responded with a ‘1’ at the end. You can click on these citations to see where the answer data is coming from — in this case, a .docx file we’ve given permission to read.  

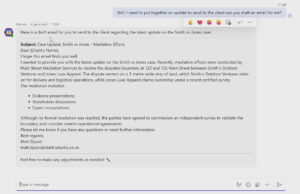
Marvin can also draft client communications based on the latest case information; great for allowing legal professionals to focus on more complex tasks whilst making sure clients stay informed. 

Security in action 

To demonstrate the security features, we asked Marvin for information outside his permitted knowledge base: “Can you tell me the weather for this week?” 

As expected, Marvin responded that he doesn’t have real-time access to weather data, offering suggestions for where to find this information instead but not attempting to retrieve it himself. This confirms that the chatbot remains secure and only accesses the data sources we’ve explicitly permitted (in this situation, just those Word documents we’ve given him access to).  

HR policy assistance 

Perhaps one of the most practical applications is helping staff navigate internal policies. 

When asked about travel policies for a business trip to New York, Marvin instantly provides information about hotel standards, business class eligibility, and expense claim deadlines — all pulled directly from company policy documents stored in SharePoint: 

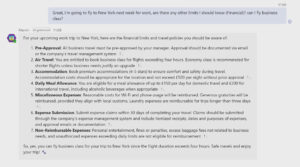
This type of instant access to policy information can really reduce the workload on HR teams who are frequently asked similar questions. Instead of exchanging multiple emails to resolve a simple query, employees get immediate answers, and HR can focus on more complex issues. 

The business benefits of Copilot Studio 

Hopefully by now you’ve been convinced to build a Marvin of your own (or a Molly, a Matteo, a Mika, etc.)  

Setting up a custom AI assistant like this will bring your business several advantages: 

  1. Time savings on routine queries: Staff can get immediate answers to common questions about policies, procedures, and internal information.  
  2. Controlled access to information: Unlike Copilot, which operates within a user’s full permissions, Copilot Studio lets you precisely control what data your AI can access and share.
  3. Scalable communication: One bot can handle thousands of queries per month across your organisation.
  4. Future applications: You can always expand your bot’s capabilities to help with more tasks, or give it new data sources, or roll it out to different departments.  

The great thing is that you can start small. Test it on some simple data retrieval tasks first, then later on, introduce more complexity. Why not give it a go?  

Which Microsoft AI tool is right for your business? 

So out of the two, which one should you choose? Here’s our recommendation: 

  • Choose Microsoft Copilot if individual productivity is your primary goal. It’s ideal for knowledge workers who need AI assistance with drafting, summarising, and organising their daily work in Microsoft 365.
  • Choose Copilot Studio if you need tailored, business-wide automation with strict control over data access. It’s perfect for creating centralised knowledge bases, automating routine customer or employee queries, and building custom workflows. 

Many organisations may benefit from implementing both tools strategically—Copilot for certain departments or roles, and Copilot Studio for company-wide processes and information management. 

Getting started with AI at your organisation 

At Synextra, we’re helping businesses across the UK implement AI tools effectively, helping them deliver real value whilst keeping security and compliance in check. 

Whether you’re just beginning to explore AI or looking to expand your existing capabilities, our cloud computing experts can guide you through selecting the right tools, configuring them for your needs, and training your team to maximise their benefits. 

Ready to discover how Microsoft Copilot and Copilot Studio could transform your business? Get in touch with our team today to find out more. 

Key benefits:
  • Maximum possible cost reduction for predictable workloads
  • Ability to exchange or return reservations if needs change
  • Option to share reservation benefits across subscriptions
  • Clear budgeting and forecasting due to fixed costs
⠀Potential drawbacks:
  • Requires accurate capacity planning
  • Less flexibility than other pricing models
  • Initial capital investment required
  • Risk of under-utilisation if workloads change

Azure Savings Plans: The flexible alternative

Savings Plans are a more flexible approach to commitment-based savings.

With these, you agree to spend a fixed amount on compute resources for one or three years, getting discounts while being free to change the types of resources you use.

Comparing them with Reserved Instances, you’ll find they offer greater flexibility while still providing substantial discounts.

Key benefits:
  • More flexible commitment structure
  • Automatic application across eligible services
  • No need to specify VM sizes or regions upfront
  • Simpler management overhead
⠀Potential drawbacks:
  • Generally lower maximum savings than RIs
  • Less predictable cost distribution
  • May require more active monitoring
  • Not available for all Azure services

Choosing between the two

The decision between RIs and Saving Plans isn’t always straightforward. Our guide on whether Reserved Instances are right for your business or not helps you with the detailed decision-making process. But in short, here’s when you should consider each option:

Choose Reserved Instances when:

  • You have stable, predictable workloads
  • You can accurately forecast capacity needs
  • You need maximum possible savings
  • You’re comfortable with longer-term commitments

Choose Savings Plans when:

  • Your workload patterns are less predictable
  • You need flexibility in resource types and regions
  • You want simpler management
  • You’re new to commitment-based pricing

The hybrid approach: combining both tools

In many cases, the best strategy is to use both Reserved Instances and Savings Plans strategically. You could do something like this:

  • Use RIs for your baseline, predictable workloads
  • Apply Savings Plans to variable workloads
  • Keep some capacity on PAYG for peak demands
  • Regularly review and adjust your mix based on usage patterns

Commitment-based savings work well for aligning your cost strategy with your workload patterns and business needs, and hybrid is a good way to do all that.

Regular review and adjustment of your commitments, guided by Cost Management insights, means that you maintain optimal savings over time.

Predictive planning with the Azure Pricing Calculator

While Cost Management helps you understand current spending and commitment-based options help you optimise it, the Azure Pricing Calculator is your tool for looking ahead. It’s a free web-based calculator that helps you estimate the costs of cloud resources before using them.

As we detail in our guide to the Azure Pricing Calculator, you can get pretty accurate estimates, but again it’s something that requires a bit of patience and understanding.

What’s so good about the Pricing Calculator?

  • Comprehensive service coverage: The calculator covers virtually every Azure service, including recent additions and preview features. This makes it invaluable for planning new deployments or estimating the cost of architectural changes.
  • Commitment integration: It can factor in Reserved Instances and Savings Plans, helping you understand the potential impact of different commitment options before making purchasing decisions.
  • Scenario modelling: The ability to save and share estimates makes it excellent for comparing different architectural approaches or creating budgets for new projects.

It’s a no-commitment service that you can play with as much as you want. You can build your dream setup with all the bells and whistles you could ever need, or try to make a budget-friendly implementation that doesn’t break the bank.

Where the calculator falls short

Despite its utility, the Pricing Calculator has several limitations you need to account for:

Static pricing only: The calculator provides point-in-time estimates. It doesn’t account for dynamic pricing changes or spot instance variations.

Limited real-world factors: It’s not great at estimating many real-world considerations like the below (without manual intervention):

  • Network egress patterns
  • Storage transaction volumes
  • Backup and disaster recovery overhead
  • Management and monitoring costs

No performance metrics: While it can tell you the cost of different VM sizes, it can’t help you determine which size your workload actually needs. That’s up to you to figure out.

Making the most of the calculator

To get the most accurate estimates from the Pricing Calculator, you’ve got to feed it good data.

1) Start with real data: Use your existing Cost Management data to understand typical usage patterns before making estimates.

2) Add buffer capacity: Include a margin for unexpected growth and overhead costs. You might consider adding 15-20% to calculator estimates.

3) Consider the full stack: Remember to include all components you might want to have:

  • Supporting services like backup and monitoring
  • Network costs, especially egress traffic
  • Storage operations and capacity
  • Management tools and extensions

4) Document assumptions: Keep clear records of the assumptions behind your estimates. This helps with future planning and explains any variances.

Combining tools for better planning

The Pricing Calculator works best when used alongside other tools.

You can always use Cost Management data to validate calculator estimates—compare calculator predictions with your actual costs to refine the estimation process.

Don’t forget — the calculator is a planning tool, not a budgeting system. Its estimates should be the starting point for discussion, not the final word on projected costs.

You can also factor in recommendations from Azure Advisor when building estimates, too.

What about Azure Advisor?

While we’ve focused on the four main cost optimisation tools, we shouldn’t overlook Azure Advisor. It’s essentially Microsoft’s built-in consultant that analyses your Azure usage and proactively recommends ways to optimise costs, improve security, enhance performance, and increase reliability.

On the cost front, Advisor will flag things like idle VMs, underutilised databases, and opportunities for Reserved Instance purchases – often catching inefficiencies that might slip through manual reviews.

Think of it as complementary to the other tools: while Cost Management shows you where your money’s going, and Reserved Instances help you save on planned usage, Advisor helps you spot waste and inefficiency you might have missed. So rather than tracking, visualising, and analysing your spending patterns, Azure Advisor takes a more proactive and recommendation-driven approach across multiple aspects of your Azure environment.

It’s worth making regular reviews of Advisor recommendations part of your cost management routine.

How you can optimise costs in different Azure scenarios

So, we’ve looked at the tools. You’ve got help with future planning, real-time analysis, and historical data. You’ve also got payment plans that can bring down prices dramatically.

What else can you do to lower your Azure costs?

Well, there’s a whole world of tinkering you can get into, depending on what you’re doing. Different workload types demand different cost optimisation approaches.

Rather than go through every scenario, we’ll give you examples of two common workloads (virtual desktop and data analytics) to show you where costs can be lowered.

Azure Virtual Desktop: balancing performance and cost

AVD presents unique cost optimisation challenges due to its usage patterns and resource requirements. As detailed in our guide to Azure Virtual Desktop costs, there are five major factors driving up costs that you should pay attention to.

Session host optimisation forms the foundation of AVD cost management. The compute costs for your VMs are typically the largest contributor to your overall AVD expenses. The key lies in finding the right balance between performance and cost-efficiency by carefully choosing VM sizes that match your user workloads. We’ve found that many organisations over-provision their session hosts, leading to unnecessary costs that could be avoided with proper sizing.

Scaling plans are equally important, yet often overlooked. Without proper scaling plans, session hosts can run 24/7 even when nobody’s using them. Using smart start/stop schedules based on actual usage patterns can dramatically reduce costs while maintaining availability during peak hours.

Storage costs often surprise organisations implementing AVD too, particularly related to FSLogix profile management. Profile containers, user data, and temporary storage all need careful consideration. We recommend implementing a tiered storage strategy, excluding unnecessary files from profiles, and regularly cleaning up profiles of former employees to keep costs in check.

Two additional factors frequently impact AVD costs: image bloat and management overhead. Each time you update your AVD images, older versions can accumulate in your Azure Compute Gallery, driving up storage costs if not regularly pruned. Meanwhile, the ongoing management of AVD environments requires expertise that, if lacking, can lead to inefficiencies and higher operational costs.

Data and analytics workloads

Data and analytics services often represent a big portion of Azure spending, with costs that can grow unpredictably if you don’t properly manage them. Storage volumes increase continuously, while complex analytics workloads can consume substantial compute resources.

  • Storage tier optimisation – Azure offers multiple storage tiers with varying costs and access speeds. Implementing automated lifecycle management policies to move infrequently accessed data to cooler tiers can significantly reduce costs without sacrificing functionality.
  • Query and processing efficiency – Poorly optimised queries in services like Synapse Analytics, Databricks, or Data Factory can consume excessive resources. Regular performance reviews and query optimization can reduce processing time and associated costs.
  • Right-sizing analytics clusters – Many organisations maintain unnecessarily large Spark clusters or Synapse SQL pools. Implementing auto-scaling based on actual workload demands and scheduling cluster shutdowns during inactive periods can deliver substantial savings.

When working with data lakes and warehouses, think about implementing data retention policies that automatically archive or delete data based on business requirements and compliance needs. This stops the continuous growth of storage costs while still giving teams access to business-critical information.

General workload optimisation

Beyond specific scenarios like AVD, effective cost optimisation benefits from a systematic approach to resource management. In short: be organised, and don’t forget to check things regularly.

As outlined in our strategies for reducing cloud costs, the best results come from a mix of automated management with regular human oversight.

Three major factors consistently contribute to unnecessary spending:

  • Skills gaps – The technical complexity of Azure means organisations without specialised expertise often overlook hidden costs or configure environments inefficiently. Addressing this might mean investing in training, hiring specialists, or partnering with an expert MSP.
  • Overprovisioning – Many businesses migrate to the cloud by simply copying their on-premises infrastructure without optimisation. Modern cloud resources are often more powerful than legacy hardware, meaning you could achieve the same performance with smaller, more cost-effective resources.
  • Idle resources – VMs, disks, and other services that are no longer actively used but still running silently drain budgets. Implementing proper governance with tagging, naming conventions, and automated policies is essential to prevent this waste.

When these are addressed, you have the opportunity to lower costs dramatically.

Lowering your Azure costs – the strategic way

As your cloud environment evolves, so should your cost strategy. Ask yourself:

  • Are you actively monitoring how your cloud use is changing?
  • When did you last review your commitments and licenses?
  • Is your team equipped with the right skills and information?

This process isn’t a one-off; it’s a continuous practice. So, keep reviewing your setup and checking those bills.

One thing to note is that Microsoft’s own tools for cost-saving recommendations might not be the most impartial source of buying information.

That’s not to say they’re untrustworthy, but it’s in their best interests to maximise your bills, so you might want to look elsewhere occasionally. You could always seek advice from a trusted partner. One with a deep understanding of keeping costs low and performance high in Azure.

That sounds awfully familiar…

Synextra’s team of cloud specialists combine deep technical expertise with practical experience in running cost-effective Azure solutions. We can help you make the most of Azure pricing tools with a sensible, no-nonsense strategy. You’ll end up with real savings alongside supporting your business objectives.

Get in touch to discuss how we can help you optimise your Azure costs effectively.

Matt Dyson, Microsoft Azure Consultant at Synextra
Article By:
Matt Dyson
Microsoft Azure Consultant
thank you for contacting us image
Thanks, we'll be in touch.
Go back
By sending this message you agree to our terms and conditions.