Following our introduction to Azure Virtual Machines, the next critical step in an IT leader’s Azure journey involves mastering the deployment and management of Azure Virtual Networks (VNets) and Azure Bastion.
This overview won’t just help in everyday Azure management tasks, but will also prepare you for Azure certification exams, covering key topics in the AZ-104 Microsoft Azure Administrator exam. We cover “configure and manage virtual networking” and “deploy and manage Azure compute resources” featured in around 40% of the AZ-104 exam.
Setting up a Virtual Network (VNet)
The first step in virtually any Azure resource deployment is setting up a Virtual Network (VNet). A VNet provides a private network in the cloud, isolating your resources and allowing them to communicate securely. To create a new VNet:
- Search for “Virtual Network” in Azure services and proceed to create a new one.
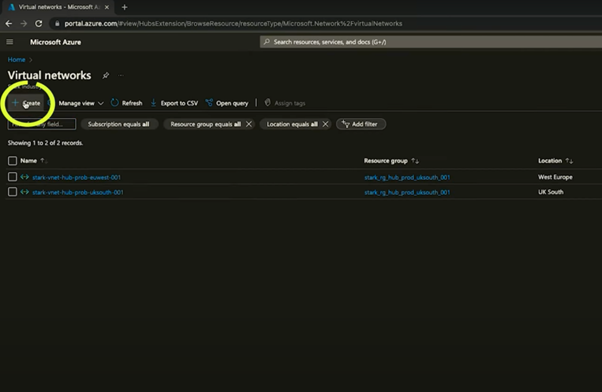
- Define the name and resource group. When creating, you’ll want to use a clear naming convention to keep track of things.
- Define your IP address space. For example, a /22 network allows for multiple /24 subnets. Subnets enable resource grouping within your VNet, catering to different purposes or departments.
- Specific subnets, like an Azure Bastion subnet, need to be named according to Azure’s requirements (e.g., “AzureBastionSubnet”) and configured with the appropriate size, like a /26 for Bastion services.
Deploying Azure Bastion
Azure Bastion provides secure and seamless RDP/SSH connectivity to your VMs directly through the Azure portal, eliminating the need for public IP addresses. To deploy Bastion:
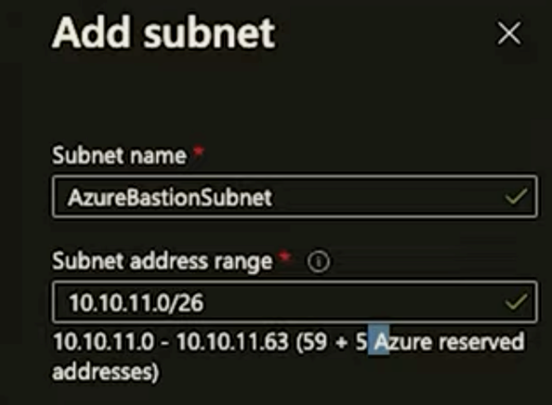
- Within your VNet configuration, add a dedicated subnet named “AzureBastionSubnet.”
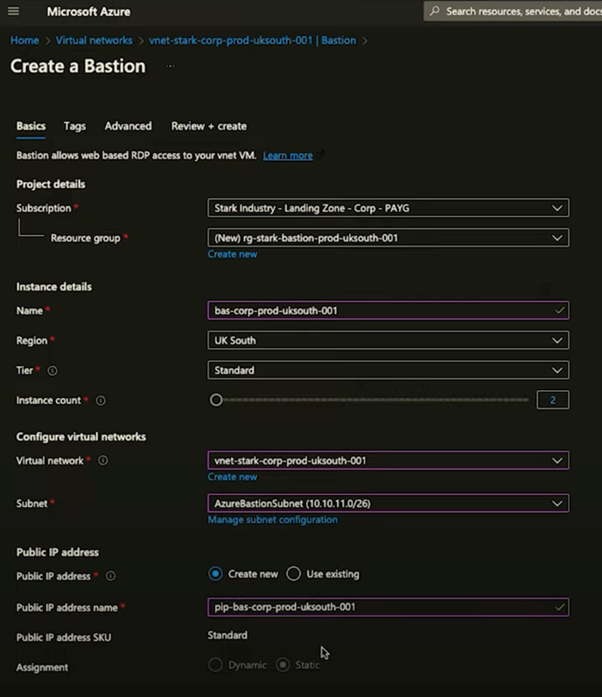
- Deploy Azure Bastion in the Bastion service, specifying its settings like name and the VNet it will service. Ensure it’s linked to the Bastion subnet and assign it a public IP for access.
Creating a Virtual Machine (VM)
Integrating a VM into your network is straightforward:
- Opt for creating a new resource group for organisational purposes, using your previous naming scheme for consistency.
- Choose an appropriate VM size and type, such as a B2s for basic applications, ensuring it fits the performance and cost requirements of your project. (See our Azure Masterclass Part 3: Choosing a VM for further guidance.)
- Configure the VM with your preferred OS and settings, emphasising security by avoiding public inbound ports and opting for a standard SSD for testing or light workloads.
- Ensure the VM is associated with your newly created VNet, adjusting network settings like disabling public IP assignment for added security.

Connecting via Azure Bastion
Once your VM is deployed, Azure Bastion allows for easy access. Here’s how to set it up:
- Access your VNet: In the Azure portal, locate the virtual network (VNet) you’ve recently created.
- Find Bastion in settings: Within the settings menu of your VNet, locate the “Bastion” option. This section allows you to either deploy Bastion automatically with preset configurations or proceed with a manual setup for greater control.
- Opt for manual deployment: Choosing to configure Bastion manually offers the flexibility to specify names, settings, and other options according to your organisational standards.
- Create a new Resource Group for Bastion: It’s recommended to use a separate resource group for Bastion to streamline management and organisation. Maintain your previous naming scheme for consistency across your Azure resources.
- Assign the VNet: Specify the VNet you wish to associate with Azure Bastion. The service automatically detects the “AzureBastionSubnet” if you’ve preconfigured it.
- Public IP requirement: Azure Bastion needs a public IP address to function. Create a new public IP with a descriptive name that follows your naming convention. This IP allows the Bastion service’s connectivity to your VMs.
- Finalise settings: Before deployment, review your settings to ensure they align with your intentions.
- Deploy Azure Bastion: Submit your configuration for deployment. The process typically takes five to ten minutes, after which Azure Bastion will be operational and ready to secure your VM access.
Testing the success of your deployment
After successfully deploying Azure Bastion, you’ll need to verify that everything is functioning as intended. This involves accessing your newly created VM through Azure Bastion, ensuring secure connectivity and internet access. Follow these steps to test the success of your deployment:
- Navigate to your VM: In the Azure portal, locate the virtual machine you’ve created for testing.
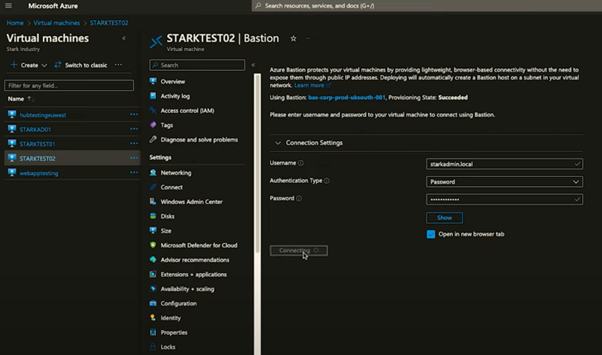
- Connect using Bastion: Within the VM’s overview page, find the “Connect” button and select the “Bastion” option. Azure Bastion provides a secure, seamless connection without the need for public IP addresses on your VMs.
- Authenticate: A pop-up window will ask for the username and password. For this test, we’ll use the local administrator account created during the VM setup process. While Azure recommends storing passwords securely in Azure Key Vault, for simplicity, we’ll input the credentials directly this time.
- Initiate the session: After entering your credentials, proceed to open a new browser tab to connect. This establishes a secure session between you and your VM via Azure Bastion.
Verifying connectivity and internet access
Once logged in, you should see the Azure interface indicating that a new session has been opened. This confirms that the Bastion service is operational and that you’ve successfully accessed your VM securely.
To ensure the VM has internet access through the virtual network it’s connected to, try browsing the web or conducting a speed test. Achieving decent download speed indicates that your network configuration is correct and that your VM has proper internet access.
Recap
By following these steps, you’ve not only deployed a virtual network and a virtual machine but also successfully implemented Azure Bastion for secure, remote access. You’ve seen the practicality and security of Bastion, showcasing its ability to allow direct connections to VMs with a simple setup process.
You also tested to confirm the operational integrity of your Azure infrastructure setup, making sure your VMs are both accessible and secure within the Azure ecosystem.
If you’re aiming for certification with your AZ-104 exam, good luck! We hope this helped.
If you’re looking for more guidance on this topic (or anything else related to setting up and running Azure), Synextra’s team of experts know the Microsoft cloud platform inside out. You can get help in just a few clicks – contact us to find out more.
Stay tuned for more in-depth explorations in our Azure Masterclass series.

