1. Understanding Microsoft Entra ID
What is Entra ID?
So, let’s kick off with the basics: What exactly is Microsoft Entra ID? At its core, Entra ID is a cloud-based service that handles user identities and controls who can access what within your organisation. Whether you’re dealing with Microsoft apps or third-party services, Entra ID is the tool that makes sure only the right people get in.
If you’re using Azure or Office 365, Entra ID is pretty much essential. It centralises all your identity management in one place, making it easier to control access and keep your environment secure. Plus, it comes with some handy security features like multi-factor authentication (MFA) and conditional access, which we’ll dive into later.
Why Entra ID is super important for your digital environment
So why should you care about Entra ID? When your digital infrastructure is so interconnected, having a solid identity management system is the best way to keep everyone’s data safe. Here are the most important features of Entra ID:
1. Centralised identity management: With Entra ID, you can manage all your user identities from one spot. This makes it easier to handle who has access to what, and ensures your access controls are consistent across the board.
2. Boosted security: Entra ID gives you tools like MFA and conditional access, which add extra layers of security. These features make it a lot harder for anyone to break in and mess with your data.
3. Simplified access control: Granting and revoking access has traditionally been a pain, but Entra ID makes it a breeze. This reduces the chances of mistakes and ensures only the right people can get their hands on sensitive information.
4. Seamless integration: If you’re already using Microsoft’s services, Entra ID fits right in. It works smoothly with Azure, Office 365, and other Microsoft apps, giving you a unified solution for managing identities.
So, with Entra ID, you’re not just keeping your digital environment secure – you’re also making life easier for yourself and your team. In the next sections, we’ll walk you through how to set it all up and get the most out of these features.
2. Getting started with Entra ID
Setting up your Entra ID tenant
First things first, if you haven’t already got an Azure subscription, that’s your starting point. Signing up is straightforward – just head over to the Azure website and get yourself set up. We’ve got a guide to the basics on our first Azure Masterclass video. Once you’ve got that sorted, it’s time to dive into the Azure portal, where you’ll find Entra ID.
Once you’re in your Azure portal, you can start in Users, Groups, and Devices straight away. Look for Entra ID – if it’s not showing up as a recent resource, just type “Entra” in the search bar, and you’ll find it. If you’re used to calling it Azure AD, no worries – searching for that will still get you to the right place. Now that you’re in, you can start creating your users and groups.
Creating users and groups
This part is pretty simple. Whether you’re setting up test accounts, admin accounts, or just general user accounts, Entra ID makes it easy. You can give each user an appropriate name and assign them to the right group.
Groups are super handy when you’re dealing with access controls, so if you haven’t already, it’s worth setting these up now. If you’ve followed along with our previous guides, you’ll have a good idea of how to do this already.
So, with your users and groups in place, we can move on to what really matters: security. There are a few key settings you’ll want to focus on to keep your environment safe, and that’s what we’re going to cover next. What we really want to focus on are your basic and essential security settings – things like password policies, multi-factor authentication, and conditional access.
Licences
For the majority of features to be available you’re actually going to need a Microsoft Entra ID P2 licence. This was previously known as Azure Active Directory P2, so you can configure these settings and understand the benefits. There is a trial licence that you can use, which will allow you to secure your environment without any cost implications for the first month. From there, it ranges between £7 and £10, depending on whether you’re running on a monthly plan or you commit to a longer subscription length. It effectively gives you a discount for the longer subscription length.
To get the trial, you can follow these very simple steps. If you go to the admin.microsoft portal, which you can see here (admin.microsoft.com), you can go into your billing and purchase services, provided you’re an administrator of your tenancy. From there, you can search for Entra ID, and you can see the Microsoft Entra ID P2 licence.
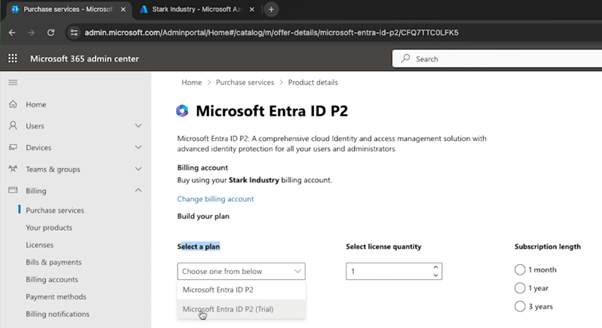
If you go to ‘details’, you’ll see that you can select a plan, and from that plan, you just want to choose the Microsoft Entra ID P2 trial, which will auto-select some settings for you. It should auto-fill your details with what you already have in your tenancy. By accepting the agreement and placing that order for a quantity of one – since you only need to have one tied to your tenant – you don’t need one for all of your users; you just need one to activate the security benefits.
3. Configuring basic security settings
Password policies
Let’s start with something basic but crucial – password policies. Now, a lot of places still have passwords set to expire every 90 days or so, but that’s not always the best approach. In fact, best practice these days is to set passwords to never expire.
Here’s how to do it: head over to your Microsoft 365 Admin Center. If you’re not seeing all the settings, click on “Show All” and then “Settings”, then “Org settings”, then navigate to the “Security and Privacy” tab. In there, you’ll find the password expiration policy. You’ll want to set it to “Never Expire.”
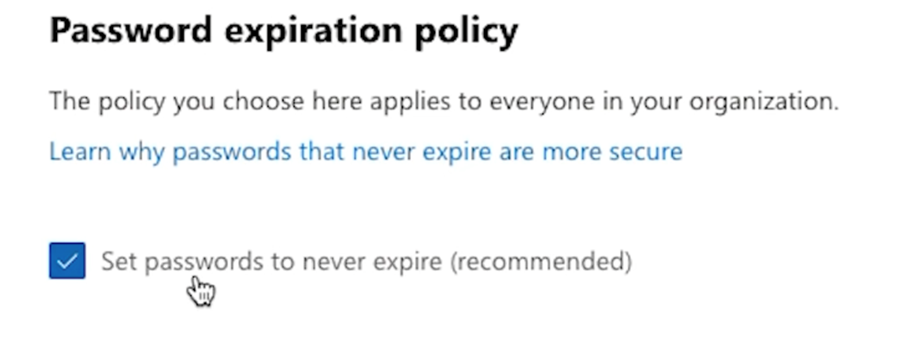
This is already set by default in some cases, but it’s worth checking just to be sure. This way, you’re not forcing users to constantly change passwords, which can actually lead to weaker security if they start picking easy-to-remember (and easy-to-guess) passwords.
Enabling self-service password reset
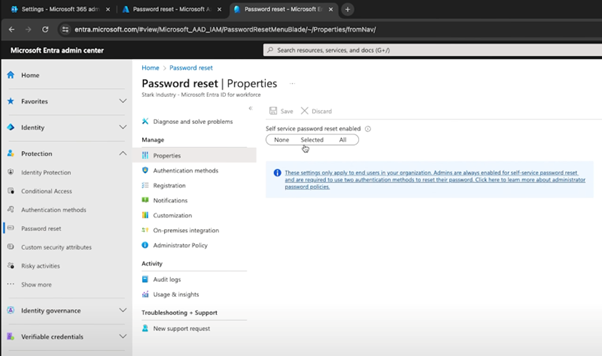
Next up, let’s talk about self-service password reset. This feature is a lifesaver for both you and your users. It allows users to reset their own passwords without needing to bug IT every time they forget it. Plus, it’s easy to set up.
You’ve got a couple of ways to enable this, the first one being through the Azure portal. Once you’re in the Entra section, scroll down to “Password Reset”. From there, you can enable the feature. You can also go into the Entra portal, find “Protection”, and you get the option for “Password Reset”.
If you’ve got a large number of users, you might want to roll this out gradually – maybe start with a select few before going company-wide. That way, you can avoid getting swamped with questions if people run into issues.
When you enable self-service password reset, you’ll set the authentication methods users need to verify their identity – like a mobile app or an email. It’s a quick process and makes a big difference in user experience and security.
4. Implementing Multi-Factor Authentication (MFA)
Why MFA is so important
Alright, now we’re getting into the meat of things – multi-factor authentication, or MFA. If there’s one thing you take away from this guide, it should be the importance of enabling MFA. Simply put, MFA adds a second layer of security on top of passwords. Even if someone gets hold of a user’s password, they won’t be able to access the account without the second factor, like a mobile app approval or a one-time passcode.
Think about it this way: without MFA, if someone guesses or steals your password, they’re in, no questions asked. But with MFA, even if they have your password, they still need that second piece of the puzzle. It’s a simple step that can make a world of difference in protecting your accounts.
Setting up MFA in Entra ID
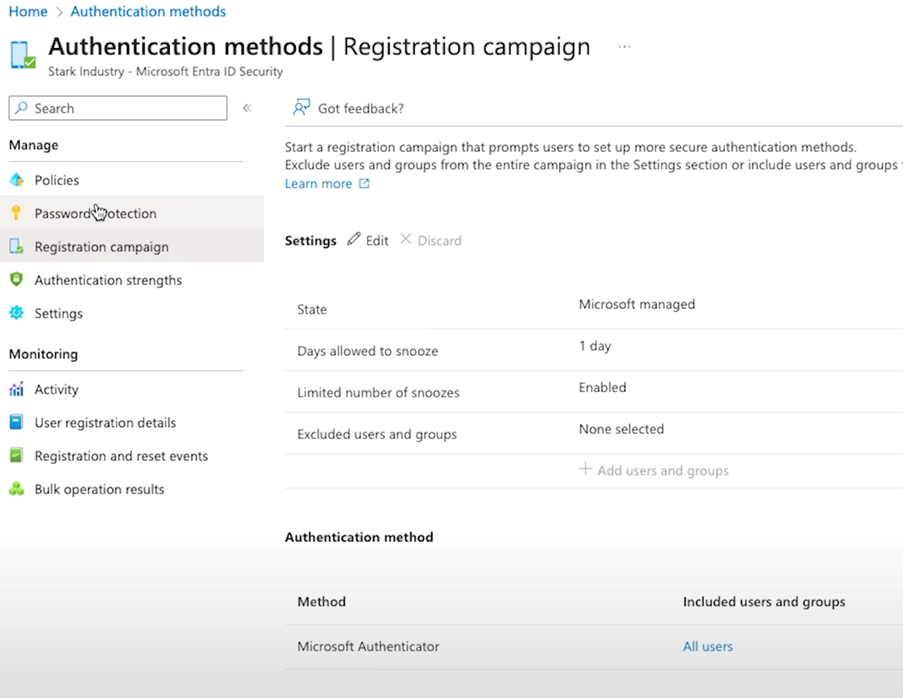
Setting up MFA is easier than you might think. Start by going to the Entra portal, and under “Protection” you’ll see the “Authentication Methods” section, where you can begin configuring MFA. The goal here is to apply MFA to all users, which should be a no-brainer for most situations.
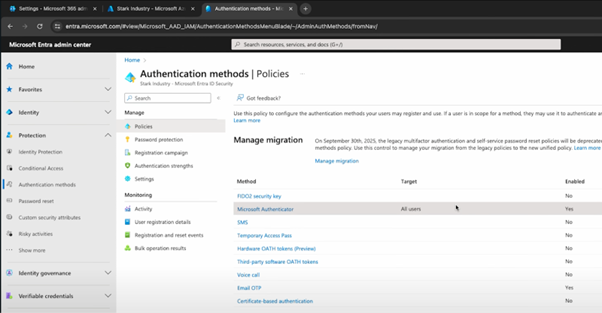
You’ll be able to set which authentication methods are allowed – like the Microsoft Authenticator app, email, or SMS. Once you’ve chosen your methods, you’ll also need to set up registration policies. This is where users are prompted to register their MFA details, like linking their phone to the Microsoft Authenticator app.
If you’re rolling this out across your organisation, you might want to set up a registration campaign. This lets users register for MFA at their own pace – maybe giving them a day or two to get it done. You can even let them snooze the reminder a couple of times, but the key is to ensure everyone gets registered without too much hassle.
The best part about MFA is that it’s easy to set up, but it significantly boosts your security. It might add a few seconds to the login process, but that’s a small price to pay for the peace of mind knowing your accounts are secure.
5. Using Conditional Access for enhanced security
Introduction to Conditional Access
Now that we’ve got the basics covered, let’s take it up a notch with conditional access. This feature is all about fine-tuning who gets access to what, based on specific conditions. Think of it as setting up rules that determine whether someone can access your resources depending on things like their location, device, or even the risk level of the sign-in attempt.
Conditional access is really important because it gives you control over how users interact with your environment. For example, you might want to block access if someone is trying to sign in from an unknown location or a device that hasn’t been approved. It’s another layer of security that can make all the difference.
Creating a Conditional Access policy
Setting up a conditional access policy is straightforward, and it’s one of the best ways to tighten security across the board. Let’s walk through creating a basic policy that enforces MFA for all users.
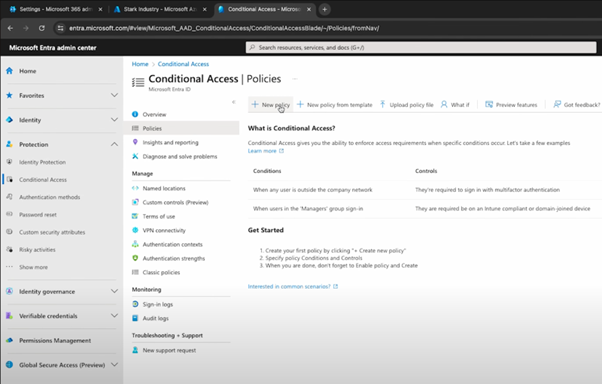
Start by heading to the Entra portal and navigating to the “Policies” section. Click “New Policy” and give it a name – something simple like “Force MFA for All Users” works fine.
Below, you can see the different parameters you can choose, like applying it to all users, particular target resources (like “All cloud apps” for example), and the exact conditions you’ll be enforcing.
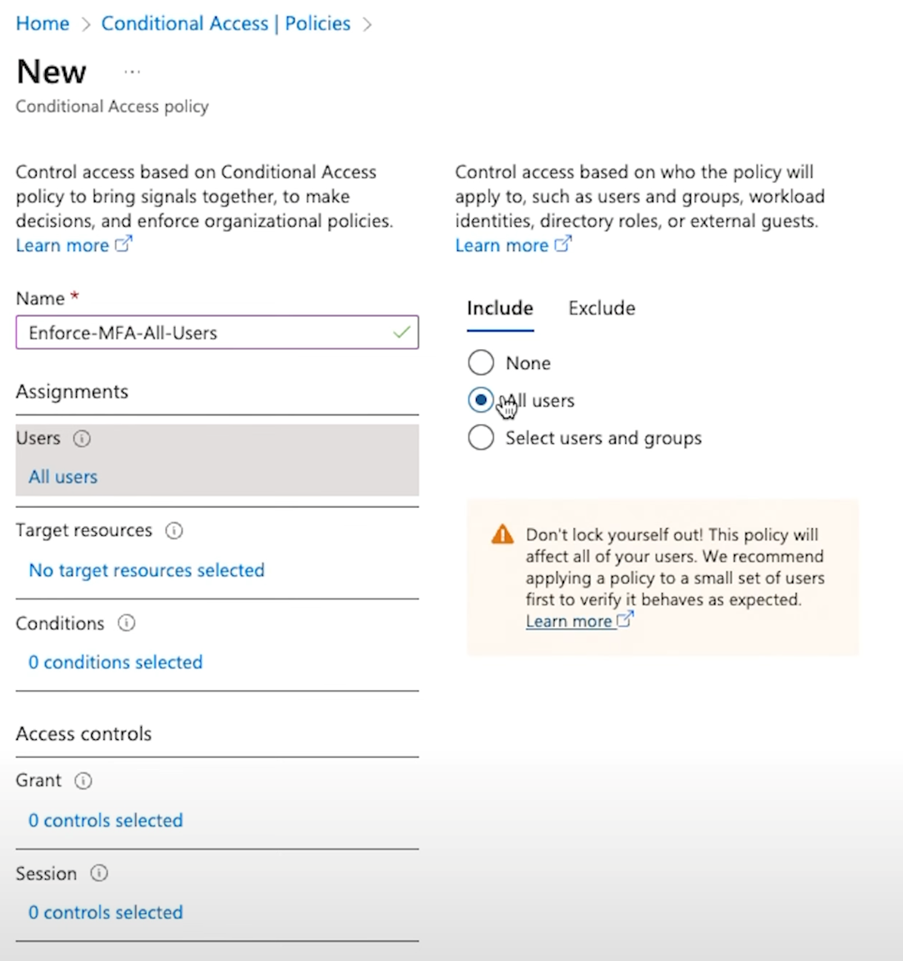
In the “Conditions” section, you can get more specific. For instance, you might only want to require MFA for modern authentication clients and block legacy authentication methods altogether. Legacy authentication protocols are less secure, so it’s a good idea to turn them off unless absolutely necessary.
Finally, in the “Access Controls” section, select “Grant Access” and check the box to require multi-factor authentication. Once that’s done, save the policy.
And just like that, you’ve set up a conditional access policy that forces MFA for all users, adding a solid layer of protection to your environment. You can get as detailed as you want with these policies, targeting specific users, apps, or even locations.
Advanced configurations
If you want to go beyond the basics, there are plenty of advanced configurations to explore. For example, you might have a situation where an automated account needs to log in from a specific location every day. MFA might not be ideal for that scenario, so you can create an exclusion for that account based on its IP address – what’s called a “Named Location” in conditional access.
You can also limit sessions, like requiring users to sign in again after a certain amount of time, or blocking persistent browser sessions, especially for admin accounts. The key is to tailor your policies to meet your specific security needs without making life too difficult for your users.
6. Fine-tuning your security settings
Managing security defaults
Before you can fully take advantage of conditional access, you might need to tweak some default settings. By default, Microsoft tenants have security defaults enabled. These are basic security settings that Microsoft applies out of the box, but they can sometimes get in the way of your custom policies.
To get the most out of conditional access, you’ll want to disable these security defaults. Here’s how: go to the Entra portal, find the “Identity” section, and then head to the “Overview” tab. Scroll down to “Manage Security Defaults” and disable them. You’ll want to note that you’re doing this because your organisation is using custom conditional access policies.
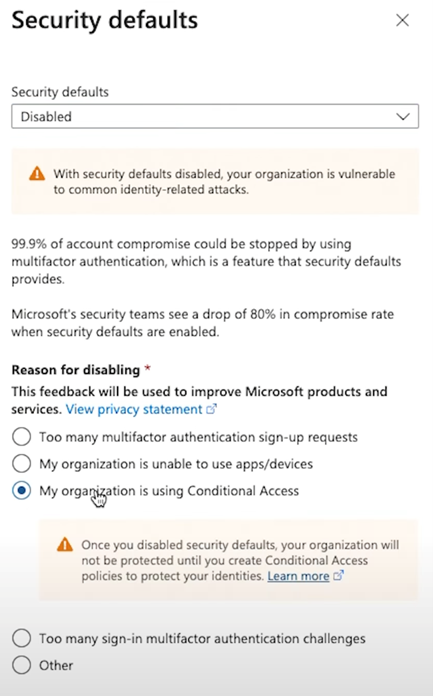
Once that’s done, your custom policies should work without any hitches.
Reviewing and improving your Identity Secure Score
Now that you’ve got the basics and some advanced settings in place, it’s time to check your Identity Secure Score. This score gives you a quick overview of how well your security setup is doing and highlights areas where you can improve.
In the Entra portal, head to the “Identity Secure Score” section. Here, you’ll see a percentage score that reflects how well you’re doing with your security configurations. The higher the score, the better your security posture.
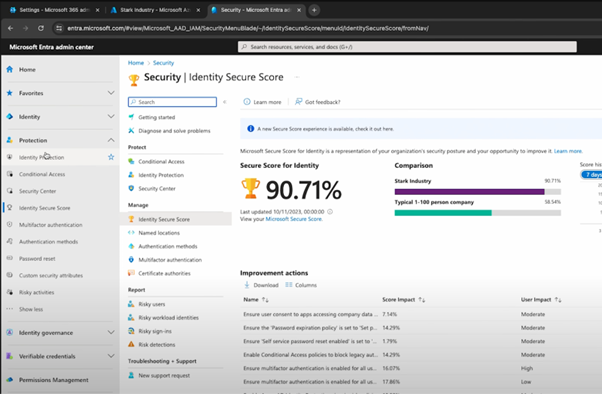
You can also see specific recommendations for boosting your score, like enabling MFA for more users or blocking legacy authentication. Each action shows you how much it will impact your score, so you can prioritise what to tackle first.
For example, setting your password expiration policy to “Never Expire” might give you a 14% boost, while enabling self-service password reset adds a smaller, but still valuable, improvement. It’s a handy tool to keep an eye on, especially if you’re looking to continuously improve your security over time.
7. Advanced Topics to Explore
Single Sign-On (SSO)
Alright, now that you’re feeling more comfortable with Entra ID, let’s touch on a few advanced topics you might want to explore down the line. First up is Single Sign-On (SSO).
SSO is a fantastic feature that lets your users access multiple applications with a single set of credentials. This not only simplifies their login experience but also reduces the number of passwords they need to manage. And since those credentials are secured with MFA and other Entra ID settings, you don’t have to worry about compromising on security.
If you’re using a lot of different apps across your organisation, SSO is definitely worth setting up. It’s easy to configure within the Entra portal, and it’s one of those things that can make everyone’s life a bit easier.
Break-glass administrators
Next, let’s talk about break-glass administrators. These are special accounts that you set up as a last resort in case something goes wrong – like if your MFA isn’t working and you’re locked out of your admin account.
The idea is to create an admin account that’s excluded from your usual conditional access policies. You’ll want to secure it with a very strong password or a FIDO key and only use it in emergencies. Think of it as your safety net, just in case the worst happens.
Setting up a break-glass account is simple. Just create a new admin account in Entra ID, exclude it from your conditional access policies, and store the credentials securely. It’s one of those “just in case” measures that can save you a lot of headaches if things go south.
Privileged Identity Management (PIM)
Finally, if you’re managing a lot of admin roles, you’ll want to look into Privileged Identity Management (PIM). PIM helps you manage who has admin privileges in your environment and can ensure that no one has permanent access to sensitive roles unless they absolutely need it.
With PIM, you can make users “eligible” for admin roles, meaning they can request access when needed, but don’t have it all the time. This adds another layer of security by reducing the risk of someone misusing admin privileges, whether by accident or maliciously.
You can even set up approval workflows, so if someone needs to activate an admin role, it has to go through another person first. It’s a great way to keep tight control over who’s doing what in your environment.
8. Wrap-up
You’ve now got a solid foundation for securing your digital environment with Microsoft Entra ID. We’ve covered the essentials, from setting up your tenant and configuring basic security settings, to implementing multi-factor authentication and creating conditional access policies. These steps will help ensure that only the right people have access to your resources, keeping your environment secure and your users happy.
As you move forward, remember to regularly check your Identity Secure Score to spot areas for improvement. And if you’re feeling confident, don’t hesitate to dive into advanced features like Single Sign-On, break-glass administrators, and Privileged Identity Management – they’re all powerful tools that can take your security to the next level.
Do check out Microsoft’s official documentation for more on the specifics if you want to learn more. Watch out for future Azure masterclasses from Synextra on our YouTube channel – and if you’d like some custom guidance from our elite cloud experts, drop us a message. Our friendly team will be delighted to assist.