Getting around the dashboard
Firstly, let’s have a quick refresh of Azure’s dashboard navigation.
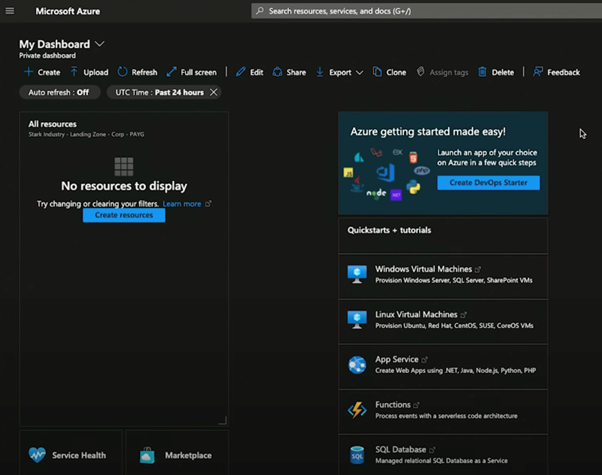
Starting at your dashboard, you can head to the top left to make changes. The dashboard is fully customisable, allowing you to add widgets like sign-in summaries to monitor key metrics.
On the homepage, you’ll see all your Azure resources and frequently accessed areas like subscriptions and resource groups for quick navigation.
The top menu offers quick access to your portal settings where you can adjust themes (we prefer dark mode, rather than the classic white and blue). You can also manage subscriptions and resources here.
There’s also a notification section for useful updates, as well as your Azure Cloud Shell – which we might cover setting up in a future guide.
View your services
The search bar is the best way to look at the resources you want to see. It’s easy enough to go through here to your subscriptions, where you can easily add new ones or manage existing ones.
The Marketplace is a treasure trove of software apps, developer services, and data. The search bar can really enhance your Azure experience – it’s really useful for getting straight to what you need.
So if you try searching for specific vendors like FortiGate you’ll find all the services and applications relevant to them. Or you can search for specific items and apps; whatever you need is no more than a search away.
Maintain best practice with Azure Advisor
Another great feature is Azure Advisor – a tool designed to make it super easy to know if you’re following Microsoft’s best practices or not.
It breaks things down into cost, security and reliability, and gives you a simple way of knowing that you’ve optimised your Azure deployments.
It’ll highlight issues and give you pretty straightforward advice, like using a NAT Gateway for certain virtual networks.
Setting up for resource management
One of the most important things to get right from the start is access to your subscriptions and resource groups, so you can organise your resources efficiently. The best way to do this is by using management groups in Azure.
Microsoft has made it super easy to make sure that you can really narrow down your permissions and make sure that everything is restricted in the way it needs to be for your organisation.
It helps with permission management across subscriptions, while resource groups are essential for grouping resources sharing the same lifecycle.
How to create a management group in Azure, step-by-step
Azure Management Groups offer a structured method to manage access, policies, and compliance across multiple Azure subscriptions. Organising subscriptions into containers called “Management Groups,” you can apply governance controls at a higher level.
In our video masterclass, we show you how to create a management group in a sandbox environment, so you can see how permissions are inherited.
And as a general guide, here are the basic steps to setting up a Management Group.
Step 1: Navigate to Azure Management Groups
- Go to the Azure Portal (portal.azure.com).
- In the search bar at the top, type “Management Groups” and select the Management Groups service from the search results.
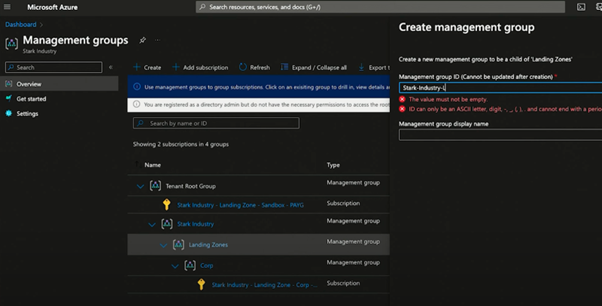
Step 2: Create a new Management Group
- Click on the “+ New management group” button.
- Enter a Management Group ID (a unique identifier) and a Display Name for the management group. For this guide, let’s use “Sandbox” as the Display Name.
- Click “Review + create”, then “Create” to establish your new management group.
Step 3: Adding subscriptions to the Management Group
- Once it’s created, look at your newly formed Management Group.
- Find the Settings pane with the three dots on the right, and select “Subscriptions”.
- Click on “Subscription” drop-down and select the subscriptions you want to add to this Management Group. Confirm by clicking “Save”.
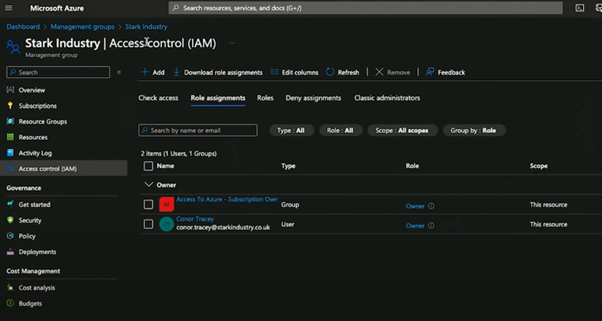
Step 4: Setting up Access Control (IAM)
- Go to your Management Group’s left-side settings pane, then “Access control (IAM)”.
- To add a new role assignment, click on “+ Add” and then “Add role assignment”.
- Choose a role, for example, “Reader”, to specify the level of access.
- Click “Next”, then “Select members”. You can search for and select users or groups to assign the role to. Confirm by clicking “Review + assign”.
Step 5: Verifying inherited permissions
- Go back to “Access control (IAM)”.
- Here, you should see the roles you’ve assigned and the members with their inherited permissions. This confirms that the permissions have been successfully applied and are inherited by all resources under this Management Group.
So you’ve now set up a Management Group in Azure, adding a layer of organisation and governance to your Azure environment. This setup brings streamlined management of access permissions and policies, for more consistency and compliance across your Azure resources.
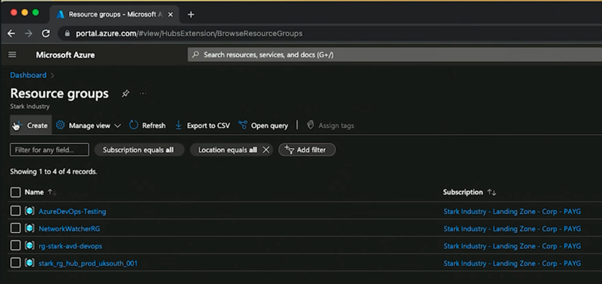
Creating Resource Groups
Resource groups are really useful for managing resources that share the same lifecycles, permissions, and policies.
Resource Groups in Azure serve as a fundamental organisational structure, allowing you to manage all your resources (like virtual machines, databases, and more) in a grouped manner. This guide walks you through the process of creating a Resource Group within the Azure portal, simplifying resource management and deployment.
If you’d like to see a live walkthrough of this, check out our video guide at 6:32.
Step 1: Open Azure Portal
- Log in to your Azure Portal account at portal.azure.com.
Step 2: Accessing the Resource Group creation tool
- On the main dashboard, click the “Create a resource” button on the top left corner.
- In the search bar at the top of the Azure dashboard, type “Resource groups” and select the Resource Groups service when it appears.
Step 3: Resource Group creation
In the Resource Groups page, click the “+ Create” button to start the process of creating a new Resource Group.
Step 4: Configuring your Resource Group
- Subscription: Select the Azure subscription under which you want the Resource Group to be created. If you have multiple subscriptions, choose the one that aligns with your project or billing preferences.
- Resource Group Name: Enter a meaningful name for your Resource Group. It’s really important to use a clear and descriptive naming convention. For example, if this Resource Group is for testing purposes, you might name it “TestingRG1”. Make sure the name reflects the group’s purpose to avoid confusion later.
- Region: Select the geographical location where your Resource Group will be hosted. It’s usually best to choose a location closest to your users or other related resources.
Step 5: Review and create
- Once you’ve configured the settings, click “Review + create” to check your Resource Group’s details.
- After reviewing, click “Create” to finalise the creation of your Resource Group.
Step 6: Confirmation and next steps
- Upon creation, you’ll receive a notification confirming that your Resource Group has been created successfully. You can now begin adding resources to this group.
- To add resources, navigate to your new Resource Group and select “Add” to search and create resources within this group.
Now that you’ve successfully created a Resource Group in Azure, you’ve laid the foundation for resource management and deployment within your Azure environment. This structure not only helps in organising resources but also in managing access and policies efficiently.
Next Steps
With the foundation set through management and resource groups, you’re now ready to start building resources, like virtual machines or app services, within your Azure account. We’ll go into these topics in our next guide.
Don’t forget to follow us for more Azure-related content. If you have any questions or need clarification on the topics covered, feel free to drop us a message. See you in the next one!